An Azure Virtual Desktop or Windows 365 environment consists of more than session hosts and Cloud PCs. As soon as the environment requires access to on-premises resources, or controlled outbound internet connectivity, the overal network architecture becomes just as important as the virtual desktops themselves.
Windows 365 can be run without any Azure integration, but what if you want to connect to Azure Resources or to on-prem resources? You fall back from Microsoft hosted Network to Azure Network Connection (or a VPN), since Microsoft changed the default outbound access setting on VNETs, the complete setup became a little bit more challenging if you want to do it the right way. There are more components that are involved besides just Cloud PCs, let’s have a look at what is involved.
| For Windows 365, Microsoft Hosted Network with VPN is still the recommended option! |
In this article, we will explain on how to build a landing zone for:
- Azure Virtual Desktop session hosts
- Windows 365 Cloud PCs using an Azure Network Connection
- Centralized internet access through Azure Firewall
- Private connectivity to on-premises networks through a Site-to-Site IPsec tunnel
- logging and troubleshooting
Designing the Reference Architecture
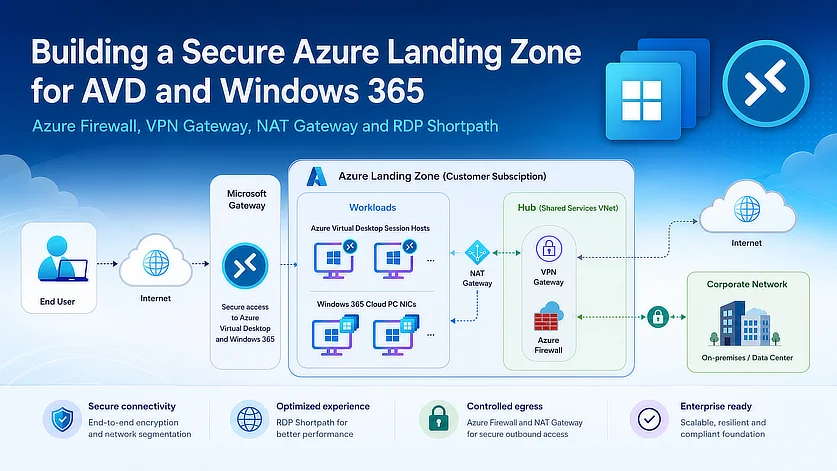
The design uses a hub-and-spoke topology with Azure VPN Gateway, Azure Firewall, NAT Gateway, VNet peering, Network Security Groups, and route tables. The following diagram provides a good starting point that you can adapt to your own environment.
The on-premises network connects to Azure through a site-to-site VPN and Azure VPN Gateway. You can replace this connection with ExpressRoute or SDWan if needed.
Users first connect through the Azure Virtual Desktop gateway. When available, RDP Shortpath establishes a direct UDP connection to the session host or Cloud PC. Optimized RDP traffic uses NAT Gateway, while other outbound internet traffic passes through Azure Firewall for centralized inspection. Traffic to on-premises resources is routed through Azure Firewall and Azure VPN Gateway. If RDP Shortpath over a managed network is not available, it will use the public internet instead.
Make sure to spread your workloads across separate subscriptions. Use one subscription for the hub and dedicated subscriptions for each spoke, this is considered a best practice and provides an easy option for cost management. I typically deploy a dedicated VDI spoke with separate subnets for Azure Virtual Desktop, Windows 365, and any other (future) VDI platforms.

Understanding the Blueprint
This blueprint serves as a reference architecture to a lot of use cases, the table below gives a better understanding on what you are looking at and how the traffic flows.
| Traffic | Path |
|---|---|
| Normal internet traffic | AVD/W365 → Azure Firewall → Internet |
| Public RDP Shortpath | AVD/W365 → NAT Gateway → Internet → Client |
| On-premises traffic | AVD/W365 → Azure Firewall → VPN Gateway → On-prem |
| On-prem → Azure | Computer – VPN Gateway → Azure Firewall → VDI spoke |
| AD/DNS traffic | AVD/W365 → Azure Firewall → Domain Controllers |
| Azure platform traffic | AVD/W365 → Azure platform endpoints |
| AVD/W365 user session (TCP) | Computer → Internet → AVD Gateway → AVD/W365 |
| AVD/W365 user session (RDP Shortpath, UDP) | Computer → Internet → AVD/W365 |
Extending your existing Active Directory Domain
If you plan to use Microsoft Entra hybrid-joined session hosts, be sure to deploy a dedicated Identity spoke that contains your domain controllers. This ensures your session hosts have reliable access to Active Directory services while keeping your identity infrastructure isolated from your VDI workloads, in line with landing zone best practices.
If you don’t have this in place yet, don’t worry. By the end of this guide, you’ll know exactly how to connect your on-premises domain controllers to Azure using a site-to-site VPN, allowing you to securely route traffic between your on-premises and Azure domain controllers and extend your Active Directory infrastructure into Azure.
Example IP plan
In this guide, I’ll use the following VNet and subnet address spaces as examples. Before implementing this in your own environment, ensure these IP ranges do not overlap with your existing on-premises networks or any other Azure virtual networks and workloads. Proper IP address planning is essential to avoid routing issues and connectivity problems later on. These subnets serve as an example minimum for this guide.
| Component | Address space |
|---|---|
| ON-Prem Network VLAN | 192.168.1.0/24 |
| Hub VNET | 10.1.0.0/16 |
| AzureFirewallSubnet | 10.1.10.0/26 |
| GatewaySubnet | 10.1.15.0/24 |
| VDI Spoke | 10.5.0.0/16 |
| AVD subnet | 10.5.1.0/24 |
| Windows 365 Subnet | 10.5.2.0/24 |
| Virtual Desktop Shared Subnet | 10.5.10.0/24 |
Preparing the landing zone
The landing zone consists of a hub, multiple spokes, and several Azure networking components that together form the secure and scalable star topology blueprint for your Virtual Desktop environment.
We’ll build the architecture step by step, configuring each component individually before connecting them together.
To give a more comprehensive and basic view of what we will deploy I created this additional image to represent the start topology. This is the essence of what we will build.

Deploying the hub VNET
Create a dedicated Hub subscription, for example sub-weu-hub, and deploy a VNET that will host your shared networking services, for this guide this will be the Azure Firewall, VPN Gateway, and NAT Gateway.

The hub acts as the central networking point for your Azure landing zone. All inbound, outbound, and inter-spoke traffic will flow over this central network. This hub-and-spoke architecture provides a scalable foundation, allowing multiple workload VNets to connect to a central hub instead of creating mesh connections between individual virtual networks.
The hub will have three major subnets that you need to create, these subnets will not be used for anything else than their dedicated Azure Service that they will host.Be sure to use the exact subnet names shown below.
These names are mandatory Azure requirements, and services such as the Azure Firewall and VPN Gateway will not deploy successfully if the subnets are named differently.
| SubnetName | Example Address Space (10.1.0.0/16) |
|---|---|
| AzureFirewallSubnet | 10.1.10.0/26 |
| AzureFirewallManagementSubnet (optional depending on SKU and Features) | 10.1.11.0/26 |
| GatewaySubnet | 10.1.15.0/24 |
Deploying Azure Firewall
Once the Hub VNet and its required firewall subnets are in place, you can deploy the Azure Firewall. Choose the appropriate SKU for your environment, create a new Public IP address, and associate the firewall with the AzureFirewallSubnet that you created earlier. When asked deploy a Policy based firewall.

The public IP address serves as the egress IP for outbound internet traffic, while all routing decisions are made using the firewall’s private IP address through User Defined Routes (UDRs). This allows you to centrally inspect, secure, and route traffic from all connected spokes.
The AzureFirewallManagementSubnet is only required when you want to use advanced features such as forced tunneling and packet captures. Although optional, I highly recommend deploying it from the start, as it provides additional flexibility for advanced networking scenarios and simplifies troubleshooting later on.

Wait with creating firewall rules for now.
Deploying VPN Gateway
An Azure VPN Gateway deployment consists of three core components: the VPN Gateway, the Local Network Gateway, and the Connection. Together, these components establish a secure IPsec tunnel between Azure and your on-premises environment or another remote site.
The VPN Gateway represents the Azure endpoint, the Local Network Gateway defines the remote network, including its public IP address and address spaces, and the Connection ties both components together by configuring the IPsec tunnel and its authentication settings. Once configured, these three components provide secure, encrypted connectivity between both networks.

Deploy the Virtual Network Gateway
Deploy the Azure VPN Gateway in the same Hub VNet. During the deployment, select the appropriate SKU for your requirements and associate the gateway with the GatewaySubnet you created earlier. For this guide, I’ll use the VPN gateway type, although you can also choose ExpressRoute if that better matches your requirements. Associate the VPN gateway with a public IP, this IP is used to connect the two sites together over the internet.
For this deployment, I selected the Basic SKU, which is more than fine for a demo environment, assigned a static Public IP address, and left both Active-Active mode and BGP disabled. This configuration is sufficient for a simple site-to-site setup.

If you require higher availability or dynamic route exchange with your on-premises environment, you can enable Active-Active mode and BGP. If you enable BGP, make sure your firewall/VPN on the other side supports it as well.
Define a Local Network Gateway
The Local Network Gateway represents the remote network on the other side of the VPN connection. It defines the public IP address or FQDN of your on-premises VPN device, along with the address spaces that are reachable through the VPN tunnel.
Create a new Local Network Gateway and select the appropriate Azure region and choose whether you want to identify the remote VPN device by its public IP address or FQDN. Whenever possible, I recommend using an FQDN, as it provides greater flexibility if the public IP address changes in the future.
Next, specify the address spaces of your on-premises network. These prefixes define which networks Azure should consider reachable through the VPN tunnel and will be used for routing traffic to the remote site.

Define a Connection
Create a new connection in Azure, this is a technical definition of the IPsec tunnel. These settings should be supported and be applied on the remote VPN endpoint as well and allow both sides to establish a secure session.

After you deploy the connection, open it up to define the pre-shared key and encryption details, the settings should be configured on your remote endpoint as well.
Make sure to define the authentication details.

And don’t forget the configuration details, feel free to pick and choose whatever you like, just make sure you configure them identical on your other side of the IP-Sec tunnel, on-Premises.

Once the connection has been deployed, Azure will automatically attempt to establish the IPsec tunnel. You can monitor its status from the Connection Overview page, where you’ll see whether the tunnel is connected or if any issues have occurred.
If you make changes to either side of the VPN configuration or need to re-establish the tunnel, you can use the Reset option. This forces Azure to renegotiate the connection without requiring you to recreate the VPN tunnel.
The configuration on the remote VPN device should look similar to the example below. Make sure to configure the Azure address spaces on the remote VPN endpoint as well, so it knows which Azure networks are reachable through the VPN tunnel. Without these remote subnets, Azure won’t route the traffic correctly between your on-premises environment and your Azure environement.
Return Traffic
Azure Firewall is a stateful firewall, but your on-premises firewall may not be. A stateful firewall keeps track of established connections and automatically allows return traffic that belongs to an allowed session. This means you don’t need to create separate firewall rules for the return traffic of every connection.
Keep in mind that the return traffic still needs to follow the correct network path. If asymmetric routing causes the return traffic to bypass the firewall that established the session, the connection can fail because the firewall cannot match the traffic to an existing session.
You’ve now built this:

Deploying the VDI Spoke
Start by creating a dedicated subscription for your Virtual Desktop workloads. For this guide, I’ll use the 10.5.0.0/16 address space and create the following subnets.
| Subnet | IP Range | NSG |
|---|---|---|
| snet-weu-virtualdesktop-avd | 10.5.1.0/24 | nsg-snet-weu-virtualdesktop-avd |
| snet-weu-virtualdesktop-w365 | 10.5.2.0/24 | nsg-snet-weu-virtualdesktop-w365 |
| snet-weu-virtualdesktop-shared | 10.5.10.0/24 | nsg-snet-weu-virtualdesktop-shared |
At this stage, only associate a Network Security Group (NSG) with each subnet. We’ll configure route tables and the remaining networking components later in the guide. The NSGs can be left default for this setup. NSGs are mini firewalls that act on outbound and inbound traffic for a subnet.
The AVD subnet will host your Azure Virtual Desktop session hosts, while the Windows 365 subnet is reserved for the network interfaces created through an Azure Network Connection (ANC). Finally, the Shared subnet is intended for shared services such as Private Endpoints, Azure Compute Gallery, and other common components. Although we won’t be using this subnet extensively in this guide, creating it now provides room for future expansion without requiring changes to your network design later.

Set up the NAT Gateway
All the basic resources to get the environment up and running are now deployed. There is, however, one additional component that Microsoft highly recommends for Azure Virtual Desktop and Windows 365 (with ANC), a NAT Gateway.
The NAT Gateway will be used for the direct UDP-based connection, also known as RDP Shortpath. While this traffic can also flow through Azure Firewall, Azure Firewall is not optimized for this long-lived kind of traffic. Using a NAT Gateway provides a more suitable and scalable path for this traffic while allowing the Azure Firewall to handle the remaining outbound and inspected traffic.
Deploy the NAT Gateway (v2) in the VDI VNET and associate a dedicated public IP, same as with Azure Firewall, this will be your outbound public ip. Link it to the subnets that will host your AVD Session Hosts and Windows 365 Cloud PC Network Interfaces.

This is all there is for the VDI spoke. All basic components are now ready, to build upon the architecture earlier, we’re now at this stage:

Connecting the dots
The next step is to connect everything and make sure traffic is routed correctly through the Azure Firewall. This allows the firewall to act as the central point for inspecting and controlling traffic between your spokes, on-premises environment, and the internet.
There is one important exception: RDP Shortpath optimized traffic. This traffic should bypass the Azure Firewall and use the NAT Gateway instead.
Configure VNET peering
To connect the VDI spoke to the Hub VNet, start by configuring VNet peering in both directions. On the Hub-to-spoke peering, enable gateway transit to allow the spoke to use the VPN Gateway deployed in the hub.
On the spoke-to-hub peering, enable Use remote gateway. This allows the VDI spoke to use the hub’s VPN Gateway and learn the routes to your on-premises networks through the peering connection.
If you want to connect your identity spoke to your hub, this should be done in exactly the same way.
Head over to the HUB VNET and create a new peering connection.

Traffic can now flow between the two VNETs.
Configure Route Tables
To make sure traffic follows the paths you define, Route Tables are required. We will associate route tables with the individual spoke subnets. I prefer using a separate route table per subnet, as this gives you more granular control over routing, although a single route table can also be associated with multiple subnets.

Route traffic from VPN Gateway to Azure Firewall
The Azure Firewall and VPN Gateway are now both deployed, but we haven’t yet configured traffic coming from the VPN Gateway to be forwarded through the Azure Firewall. This is done through a Route Table. Create a Route Table in your hub and give it a name like rt-vpn-firewall. Enable route propagation to make sure that the on-prem routes can be learned by the hub.

| Route propagation shouldn’t be disabled on GatewaySubnet. If this setting is disabled, the gateway doesn’t function properly. |
Once the route table has been created, navigate to Subnets and associate it with the GatewaySubnet.

Now that the GatewaySubnet has a route table associated with it, we can define how traffic should be routed. We want traffic for the VDI address range to be forwarded to the Azure Firewall.
Create a route and define an address range, you can choose the subnet or a larger address range like the VNET, depending on your needs. In the example below, I created a route for 10.5.0.0/16. This means that all traffic destined for this address range is forwarded to the Azure Firewall.
Make sure to select Virtual appliance as the next hop type and specify the private IP of your Azure Firewall as the next hop address.
Traffic can now flow from on prem to the Firewall.

| Make sure to deploy a firewall rule on your on-premise network as well, where it states that Internal Traffic is allowed over the VPN connection. |
Route traffic from Azure to On-Prem
Traffic initiated from Azure towards the on-premises network, such as an RDP connection from an AVD session host to an on-premises server, does not require an additional route if the Azure spoke already forwards its traffic to Azure Firewall using a route such as 0.0.0.0/0. Azure Firewall then routes the traffic towards the VPN Gateway and the on-premises network.
You only need to make sure that the required traffic is allowed through Azure Firewall. We’ll cover how to configure these firewall rules in the next step and also talk about 0.0.0.0/0

| Make sure to deploy a firewall rule on your on-premise network as well, where it states that Traffic coming from Azure is allowed to pass through to your internal network. I recommend maintaining all of the traffic filtering on one side of the connection. For example, you can allow any traffic coming from on-premises to Azure and apply the required filtering on the Azure Firewall. OR, you do it the other way around and allow all Azure traffic through the Azure Firewall and apply the firewall rules on your on-premises firewall. This avoids having to maintain matching rules on both firewalls for every connection, which is much easier to maintain. |
Route traffic from hub to spoke
Create a new route table for each of your spoke subnets. Set Propagate gateway routes to No. Otherwise, routes to your on-premises network ranges can be learned automatically from the VPN Gateway and propagated to the subnet.

If you would enable this setting, If a client then connects to an on-premises resource, the propagated route can provide a more specific path than your default 0.0.0.0/0 route through the Azure Firewall. As a result, the traffic can bypass the firewall and travel directly toward the VPN Gateway. Disabling gateway route propagation allows us to explicitly control the path using UDRs and route the on-premises traffic through the Azure Firewall.
The default route towards the Azure Firewall
Now add the required route to the route table. The default route should send all traffic (0.0.0.0/0) to the private IP address of your Azure Firewall. This makes sure that traffic follows the firewall by default for inspection and routing. Make sure to select Virtual Appliance as next hop type.
Azure uses longest prefix matching, so when a more specific route exists, it takes precedence over the 0.0.0.0/0 default route.

Using the NAT gateway for RDP optimized Traffic.
We also associated a NAT Gateway with the subnet. A NAT Gateway is slightly different from an appliance such as Azure Firewall because you don’t route traffic directly to it, you just link it to your subnet.
With a default route of 0.0.0.0/0 towards Azure Firewall, all outbound traffic follows the Azure Firewall, even when a NAT Gateway is associated with the subnet. To bypass the firewall for specific traffic, we can add a more specific UDR using Internet as the next hop. Because the more specific route takes precedence over the default route, that traffic exits directly from the subnet and uses the associated NAT Gateway for outbound connectivity.

This post does not cover VWAN, so you end up with two routes configured on the subnet.

If you want to exclude RDP optimizations using a third party platform or VPN solution. you should whitelist the following two IP ranges.
| Range | Purpose | Protocol |
|---|---|---|
| 40.64.144.0/20 | TCP based RDP traffic | TCP 443 |
| 51.5.0.0/16 | UDP based RDP traffic | UDP 3478 |
| You can also use *.wvd.microsoft.com as a FQDN instead of the IP. The 40.64.144.0/20 subnet covers the RDP flow associated with *.wvd.microsoft.com but not every endpoint within *.wvd.microsoft.com. Using the FQDN is thus preferred. |
Associating the Route Table with a Subnet
As a last step, associate the route table with the right Subnet.

Once again, a small reminder how the propagation should be configured, if you do this wrong, you’re traffic might not be flowing the way you expect.
| Route Table Connected To | Enable Route Propagation |
|---|---|
| GatewaySubnet | Yes |
| Any Spoke connecting to the Hub | No |
Configure Firewall Rules
Azure Firewall denies traffic by default, so it is now up to you to define which traffic should be allowed through the firewall. There is a lot to allow before you end up with a working environment. Let’s go over them one by one.
IP Group
Using an IP Group as your source is a good governance choice rather than scattering subnet ranges throughout your firewall rules. Microsoft specifically recommends using an IP Group to represent the session hosts when configuring AVD firewall policies.
Start by creating an IP group and associate it with your session host subnets. This IP group can be used later on as a source for our firewall rules.


Allow AVD and W365 required endpoints
| Don’t start configuring all these endpoints blindly, make sure to read this section first before starting to deploy. |
Microsoft provides a specific list of required endpoints that Azure Virtual Desktop and Windows 365 need to function correctly. You can find the complete and up-to-date endpoint lists in the Microsoft Learn documentation and I documented the current list below as well.
| Address | Protocol | Outbound port | Purpose | Service tag |
|---|---|---|---|---|
169.254.169.254 | TCP | 80 | Azure Instance Metadata Service (IMDS) | N/A |
168.63.129.16 | TCP/UDP | 80, 32526 (TCP), 53 (TCP/UDP) | Azure Platform Service Connectivity | N/A |
login.windows.net | TCP | 443 | Sign in to Microsoft Online Services and Microsoft 365 | AzureActiveDirectory |
*.events.data.microsoft.com | TCP | 443 | Telemetry Service | N/A |
www.msftconnecttest.com | TCP | 80 | Detects if the session host is connected to the internet | N/A |
*.prod.do.dsp.mp.microsoft.com | TCP | 443 | Windows Update | N/A |
*.sfx.ms | TCP | 443 | Updates for OneDrive client software | N/A |
*.digicert.com | TCP | 80 | Certificate revocation check | N/A |
*.azure-dns.com | TCP | 443 | Azure DNS resolution | N/A |
*.azure-dns.net | TCP | 443 | Azure DNS resolution | N/A |
*eh.servicebus.windows.net | TCP | 443 | Diagnostic settings | EventHub |
login.microsoftonline.com | TCP | 443 | Authentication to Microsoft Online Services | AzureActiveDirectory |
51.5.0.0/16 | UDP | 3478 | Relayed RDP connectivity | WindowsVirtualDesktop |
*.wvd.microsoft.com | TCP | 443 | Service traffic including TCP-based RDP connectivity | WindowsVirtualDesktop |
catalogartifact.azureedge.net | TCP | 443 | Azure Marketplace | AzureFrontDoor.Frontend |
*.prod.warm.ingest.monitor.core.windows.net | TCP | 443 | Agent traffic and diagnostic output | AzureMonitor |
gcs.prod.monitoring.core.windows.net | TCP | 443 | Agent traffic | AzureMonitor |
azkms.core.windows.net | TCP | 1688 | Windows activation | Internet |
mrsglobalsteus2prod.blob.core.windows.net | TCP | 443 | Agent and side-by-side (SXS) stack updates | Storage |
wvdportalstorageblob.blob.core.windows.net | TCP | 443 | Azure portal support | AzureCloud |
oneocsp.microsoft.com | TCP | 80 | Certificates | AzureFrontDoor.FirstParty |
www.microsoft.com | TCP | 80 | Certificates | N/A |
*.aikcertaia.microsoft.com | TCP | 80 | Certificates | N/A |
azcsprodeusaikpublish.blob.core.windows.net | TCP | 80 | Certificates | N/A |
*.microsoftaik.azure.net | TCP | 80 | Certificates | N/A |
ctldl.windowsupdate.com | TCP | 80 | Certificates | N/A |
aka.ms | TCP | 443 | Microsoft URL shortener, used during session host deployment on Azure Local | N/A |
*.service.windows.cloud.microsoft | TCP | 443 | Service traffic | WindowsVirtualDesktop |
*.windows.cloud.microsoft | TCP | 443 | Service traffic | N/A |
*.windows.static.microsoft | TCP | 443 | Service traffic | N/A |
We don’t need all for this demo
We’ll make sure that all Cloud PCs and AVD session hosts have outbound internet access, while the RDP-optimized traffic bypasses the Azure Firewall. We already configured this exception using a UDR for the WindowsVirtualDesktop service tag.
This means we only need a few additional outbound firewall rules. One that allows general web traffic over TCP 80 and 443. If we take a closer look at Microsoft’s list of required endpoints, only two entries don’t match our current configuration and require additional firewall rules: which are:
- Windows Activation
- Platform Services
All other traffic will be using the outbound Web firewall rule or bypass the firewall using the UDR for the WindowsVirtualDesktop service tag and will be routed over the NAT Gateway.
Allow Web Traffic
Since we didn’t do this yet, create an Application Rule on your Azure Firewall. Define the source IP range for your Virtual Desktop workloads. For more granular control, use the specific IP group created earlier. Instead of the entire VNet address space.
I created a dedicated Rule Collection Group (rcg-vdi-internet) for outbound internet access from the AVD environment and added an Application Rule Collection to it.
Within the rule collection (arc-vdi-internet-access), I created an allow-web rule using the IP Group we created earlier as the source. For the protocols, I configured HTTP:80, HTTP:8080, HTTPS:443, HTTPS:8443. Ports 8080 and 8443 are commonly used as alternative ports for HTTP and HTTPS traffic, so I’ve included them in this rule as well.
Be restrictive in a production environment. Avoid the use of wildcards as destination addresses.
As mentioned earlier. This rule covers 90% of all required endpoints.
| Rule |
|---|
| Name: allow-web Source: IP Group (Your session hosts) Protocol: Http:80,Http:8080,Https:443,Https:8443 TLS inspection: Enable if desired and if your SKU allows it Destination Type: FQDN Destination: * |

Allow Windows Activation
Windows activation uses a different port and is therefore not covered by our existing allow-web application rule. To allow this traffic, I created a separate Rule Collection Group named rcg-vdi-platform and added a Network Rule Collection named nrc-avd-platform.
We can now add the required Windows activation network rule to this collection:
| Rule |
|---|
| Name: allow-windows-activation Source: IP Group (Your session hosts) Protocol: TCP Destination Ports: 1688 Destination Type: IP address, if your sku allows it, select FQDN. Destination: 20.118.99.224,40.83.235.53, if using FQDN insert azkms.core.windows.net |
Allow Platform Service Connectivity
The final rule required for now allows the session hosts and Cloud PCs to retrieve VM metadata and communicate with the Azure platform.
Session host VMs and Cloud PCs require access to two Azure platform IP addresses for services such as metadata retrieval and health monitoring. Unlike the FQDN-based endpoints we configured earlier, these are Azure-internal platform endpoints and require specific network rules.
Important: Traffic to these IP addresses must not be intercepted, proxied, or redirected. Blocking or redirecting this traffic can result in provisioning failures, health monitoring issues, and connectivity problems for both Azure Virtual Desktop and Windows 365. We will therefore create dedicated rules to ensure this traffic follows the required path. Make sure that these rules don’t have TLS inspection enabled.
I added the following rules to the nrc-avd-platform network rule collection.
| Rule 1 |
|---|
| Name: allow-avd-platform-service-connectivity Source: IP Group (Your session hosts) Protocol: TCP Destination Ports: 80,32526 Destination Type: IP address Destination: 168.63.129.16 |
| Rule 2 |
|---|
| Name: allow-avd-platform-service-connectivity-dns Source: IP Group (Your session hosts) Protocol: TCP/UDP Destination Ports: 53 Destination Type: IP address Destination: 168.63.129.16 |
| Rule 3 |
|---|
| Name: allow-avd-platform-metadata Source: IP Group (Your session hosts) Protocol: TCP Destination Ports: 80 Destination Type: IP address Destination: 169.254.169.254 |

| If you don’t allow general web traffic, make sure to create firewall rules for all the remaining endpoints listed in the required endpoints table. This ensures that your AVD session hosts and Cloud PCs can reach all Microsoft services they need to function correctly. For the purpose of this demo, allowing general web traffic, for me, is sufficient. |
Optional: Allow traffic between spokes
If you want to open traffic to domain controllers on Azure or on-prem for a domain join, create a dedicated Rule Collection Group like rcg-domain-services and place a Network Rule Collection named nrc-vdi-domainservices within it.
This keeps all Active Directory-related firewall rules separate from your general internet and AVD platform traffic, making the firewall policy easier to manage and troubleshoot.
configure the following rules from your session hosts to your domain controllers.
| Rule | Source | Destination | Protocol | Destination Port(s) | Purpose |
|---|---|---|---|---|---|
allow-ad-dns | ipg-vdi-sessionhosts | ipg-domain-controllers | TCP/UDP | 53 | DNS |
allow-ad-kerberos | ipg-vdi-sessionhosts | ipg-domain-controllers | TCP/UDP | 88 | Kerberos authentication |
allow-ad-rpc-endpoint | ipg-vdi-sessionhosts | ipg-domain-controllers | TCP | 135 | RPC Endpoint Mapper |
allow-ad-ldap | ipg-vdi-sessionhosts | ipg-domain-controllers | TCP/UDP | 389 | LDAP |
allow-ad-smb | ipg-vdi-sessionhosts | ipg-domain-controllers | TCP | 445 | SMB / Group Policy / SYSVOL |
allow-ad-kerberos-password | ipg-vdi-sessionhosts | ipg-domain-controllers | TCP/UDP | 464 | Kerberos password change |
allow-ad-ldaps | ipg-vdi-sessionhosts | ipg-domain-controllers | TCP | 636 | LDAPS |
allow-ad-global-catalog | ipg-vdi-sessionhosts | ipg-domain-controllers | TCP | 3268 | Global Catalog |
allow-ad-global-catalog-ssl | ipg-vdi-sessionhosts | ipg-domain-controllers | TCP | 3269 | Global Catalog over SSL |
allow-ad-rpc-dynamic | ipg-vdi-sessionhosts | ipg-domain-controllers | TCP | 49152-65535 | Dynamic RPC ports |
| Don’t forget to enable Gateway transit on the Hub VNet peering and Use remote gateway on the spoke VNet peering. This allows the spoke to use the VPN Gateway deployed in the hub to reach your on-premises network. The goal of this architecture is to use the Firewall as the center of the star topology. |
The landing zone setup is done.
Looking at our checklist, the Hub is now fully deployed, including the Azure Firewall and VPN Gateway. Traffic can flow between the Hub and the Virtual Desktop spoke, as well as between the Virtual Desktop and Identity spokes. The route tables and firewall should route outbound traffic correctly. The only thing that’s missing is an AVD or Windows 365 deployment.
You’ve built this so far:

Adding AVD or Windows 365 to the mix
To configure the last moving part I created a Windows 365 Azure Network Connection and deploy a couple of Cloud PCs in said network and assigned some users to those Cloud PCs. If you don’t know how that works, I described the process in a previous blogpost.
I now see the new Cloud PCs as connected devices in my Windows 365 subnet.

I signed in to the Cloud PC and checked its public IP address using one of the many online IP-checking services. The result matches the public IP address of the Azure Firewall, confirming that outbound internet traffic from the Cloud PC is correctly routed through the firewall. When checking the Cloud PC connection details I also see that the connection uses RDP ShortPath through RDP Multipath over a relayed connection (TURN) and is not using the public gateway.

A NAT Gateway doesn’t support STUN, so this (sort of) proves my connection is going outbound over the NAT gateway. Please read my other blogpost if you want to learn more about RDP Shortpath or RDP Multipath.
You could also verify the Metrics of the NAT Gateway to see if it’s being used or not.

This finalizes the diagram.
Troubleshooting: Checking Firewall Logs
I want to access my on-premises file server from my Cloud PC, but the connection isn’t going through. Since we expect this traffic to pass through the Azure Firewall, that’s the first place to start troubleshooting. I performed a test-netconnection to simulate some traffic that we’ll match on an Azure Firewall log.

Open Azure Firewall, navigate to Logs, and filter for traffic between your Cloud PC subnet and the on-premises network. You can use the following KQL query to filter by source and destination IP range:
AZFWNetworkRule| where DestinationIp startswith "192.168.1."| where SourceIp startswith "10.5.2."
After running the query, I can see the connection attempts coming from my Cloud PC that should go to the on-prem IP. The firewall logs also show that my connection is being blocked by the “Default Action”.
As Azure firewall restricts all traffic by default, the solution to this is to create a new rule to allow this traffic to the on-prem IP. Just create the rule similar as instructed earlier in this post.

| Tip: you can type multiple queries below each other, select one and click run, only the selected KQL code will be executed. |
Troubleshooting: Check IP Flow
This test won’t work for Cloud PCs, as Network Watcher’s IP flow verify requires access to the underlying virtual machine. Cloud PCs are hosted in a Microsoft-managed subscription, while only their network interfaces are connected to your VNet through the Azure Network Connection. Having access to the NIC alone isn’t sufficient to run the IP flow verify test.
For AVD session hosts, however, you do have access to the underlying Azure VMs, so IP flow verify can be used. Open Network Watcher, select IP flow verify, and enter the same source, destination, port, and protocol information you identified in the Azure Firewall logs. This allows you to verify whether the traffic is allowed or denied and identify the network security rule responsible for the result.
An easy workaround to this is to just deploy a temporary VM in the subnet to perform your connection tests with. After the setup is working you can simply delete it.

Troubleshooting: Effective routes
If traffic isn’t following the expected route and you don’t see any corresponding traffic in the Azure Firewall logs, traffic might be bypassing the firewall.
Open the Route Table or Network interface of the VM and check Effective routes and select one of the powered-on clients. This gives you an overview of all routes currently available to that specific client. In this example, we can see a route to the on-premises network with Virtual Network Gateway as the next hop. This isn’t the desired behavior, as it allows traffic to reach the VPN Gateway directly instead of passing through the Azure Firewall.
This indicates that gateway route propagation is enabled on the route table. Set Propagate gateway routes to No to prevent these routes from being automatically propagated to the subnet. We can then use our own UDRs to explicitly route on-premises traffic through the Azure Firewall.

| If all traffic should be coming through, but it’s still not working. Don’t forget to check the Windows firewall as well on your AVD Session Host or Cloud PC. |
| You can run Effective Routes on the NIC of a Cloud PC as well. Make sure the machine is turned on. Or simply deploy a temporary VM in the subnet to do some troubleshooting. |
Wrapping up
You’ve now built a complete landing zone that can serve as a scalable foundation for different workloads. You know how to provide centralized routing through Azure Firewall and how to securely connect your Azure environment to your on-premises network using a VPN gateway.
You also understand how the different traffic flows and how to control them with VNet peering, route tables, and firewall rules. Whether you’re deploying Azure Virtual Desktop, Windows 365, or both, this gives you a solid foundation that you can further extend with additional spokes, Private Endpoints, ExpressRoute, or other shared Azure services as your environment grows.
Ready with this? Start learning on how to deploy this using code.



Leave a Reply