Windows 365 Link is designed to be deployed in just a couple of minutes, by any user, even without IT knowledge. It sounds great, and it works great, but only if the user has previously connected to their Cloud PC.
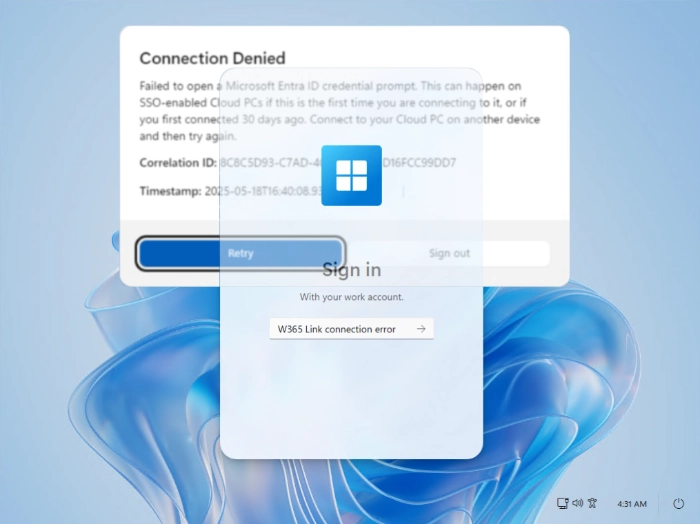
If the user attempts to connect to a new or reprovisioned Cloud PC from a Windows 365 Link device without having done so before, they’ll receive the following message during the connection attempt, which prevents them from connecting successfully.

The Cause
The message “Failed to open a Microsoft Entra ID credential prompt” already explains what’s happening. The second part of the message “This can happen on SSO-enabled Cloud PCs if this is the first time you are connecting to it, or if you first connected 30 days ago. Connect to your Cloud PC on another device and then try again” basically says it all and provides the easy solution to this Microsoft Entra ID error.
This error-message is SSO related which is a setting you can configure during the setup of Windows 365. When creating a provisioning policy you have the option to enable Microsoft Entra Single Sign-On. In general I always enable this without much further thought.

This however will result in a one-time popup where the user has to accept connection with the remote Cloud PC. This looks like the image below and we are all familiar with it. Microsoft is currently not capable of showing this interactive dialog in the Windows 365 Link OS. I hope this will be fixed in a future update as this has a big impact on user experience and the total implementation simplicity.

Besides a newly provisioned Cloud PC, the popup can also show when you enable SSO on an already existing provisioning policy or when you reprovision a Cloud PC.
The Solution: Just connect from another device
The solution is simple, ensure the user has previously connected to their Cloud PC. However, this approach isn’t quite suitable for a production environment. Consider a scenario where a newly set up factory line and Frontline Workers are provided with Windows 365 Link devices to access their Cloud PCs.
Requiring them to connect from a different device beforehand just to get started is far from ideal. Even if they do so, and acknowledge the connection, the prompt will return each 30 days.
There is a better solution to fix this.
The Better Solution: Disable the Microsoft Entra ID SSO Credential Pop-up
Disabling the Popup all together is a better solution, Windows 365 is managed device after all, and so are your Cloud PCs. There is no harm in configuring this.
Step 1: Dynamic Group
Start by creating a dynamic group, this group will be used to target all your Cloud PCs. If you already have this, take note of the group ID and the name of the group. If you only want to do this for certain users, make sure to create a dynamic group which targets a specific provisioning policy.
If you are creating a new group, use this dynamic query.
(device.deviceModel -startsWith "Cloud PC")
Take note of the group ID of this newly created group.
Step 2: Enable Entra authentication for RDP on the SPN
Enabling Entra authentication for RDP and suppressing the SSO consent prompt is handled via a script. This script configures both the legacy and new Microsoft Remote Desktop clients, as well as the Windows Cloud Login service principal name (SPN). It ensures the SPN is properly set up to support RDP authentication through Microsoft Entra ID.
I’ll share the complete script later.
Step 3: Hide the consent prompt dialog
Same as with step 2, hiding the consent prompt is done through a script as well. What this does exactly, is adding the devices from the “all cloud pcs group”, created earlier, to the list of trusted devices that is configured on the Remote Desktop and the Windows Cloud SPNs. It sounds harder than it is. Microsoft provides nice documentation for this, but for your convenience it’s consolidated in the script below as well.
The script
Creating the dynamic group is a manual step because you might already have this group, just fill in the group ID and the Group name in the variable in the script below. Run it with Powershell 7 and you’re good to go. Run this with Powershell 7 and use your admin account to sign in to Microsoft Graph.
# This script enables Entra ID authentication for Remote Desktop Protocol (RDP) on the Microsoft Remote Desktop Service (MSRDS) and Windows Client (WCL) service principals.$allCPCgroupID = "<GROUP ID of all Cloud PCs group>"$allCPCgroupName = "<Group NAME of all Cloud PCs group>"# Part 1 - Install the required modules and connect to Microsoft Graph and update the service principal configurations.Import-Module Microsoft.Graph.AuthenticationImport-Module Microsoft.Graph.ApplicationsConnect-MgGraph -Scopes "Application.Read.All","Application-RemoteDesktopConfig.ReadWrite.All"$MSRDspId = (Get-MgServicePrincipal -Filter "AppId eq 'a4a365df-50f1-4397-bc59-1a1564b8bb9c'").Id$WCLspId = (Get-MgServicePrincipal -Filter "AppId eq '270efc09-cd0d-444b-a71f-39af4910ec45'").IdIf ((Get-MgServicePrincipalRemoteDesktopSecurityConfiguration -ServicePrincipalId $MSRDspId) -ne $true) { Update-MgServicePrincipalRemoteDesktopSecurityConfiguration -ServicePrincipalId $MSRDspId -IsRemoteDesktopProtocolEnabled}If ((Get-MgServicePrincipalRemoteDesktopSecurityConfiguration -ServicePrincipalId $WCLspId) -ne $true) { Update-MgServicePrincipalRemoteDesktopSecurityConfiguration -ServicePrincipalId $WCLspId -IsRemoteDesktopProtocolEnabled}Get-MgServicePrincipalRemoteDesktopSecurityConfiguration -ServicePrincipalId $MSRDspIdGet-MgServicePrincipalRemoteDesktopSecurityConfiguration -ServicePrincipalId $WCLspId#part 2 - Hide the sso prompt for the dynamic group created earlier$tdg = New-Object -TypeName Microsoft.Graph.PowerShell.Models.MicrosoftGraphTargetDeviceGroup$tdg.Id = $allCPCgroupID$tdg.DisplayName = $allCPCgroupNameNew-MgServicePrincipalRemoteDesktopSecurityConfigurationTargetDeviceGroup -ServicePrincipalId $MSRDspId -BodyParameter $tdgNew-MgServicePrincipalRemoteDesktopSecurityConfigurationTargetDeviceGroup -ServicePrincipalId $WCLspId -BodyParameter $tdgConclusion
Windows 365 Link is built to simplify access to Cloud PCs, even for users without IT knowledge. But as we’ve seen, the default behavior around Microsoft Entra SSO can introduce unnecessary friction.
While asking users to connect from another device might work in isolated cases, it’s not scalable or practical. By proactively configuring Entra ID for RDP authentication and suppressing the SSO consent prompt, you ensure a seamless experience for your users, just as Windows 365 Link is intended to deliver.
Fortunately it’s easy to solve, with the right setup and the script provided, you can eliminate the troublesome prompt. Let Windows 365 Link do what it’s designed to do and get your users productive in seconds.
Leave a Reply